How to Know if You Are Using Windows 10 Mbr or Uefi
When you lot want to switch firmware blazon from the Basic Input/Output Organization (BIOS) to Unified Extensible Firmware Interface (UEFI) without modifying the current installation or deleting the data stored on the drive, or you plan to upgrade Windows ten to Windows xi, you can convert the bulldoze using a Chief Boot Record (MBR) to a GUID Partition Table (GPT) partition style using the "MBR2GPT" tool.
BIOS is a slice of lawmaking that resides on the motherboard that connects the hardware and software. This code has been around for a long fourth dimension, and while it worked well, it was never designed for modernistic hardware, and it had many limitations, including limitations to partitions smaller than 2TB.
UEFI is the new firmware type designed to replace the former BIOS style. Information technology introduces boosted features, including support for partitions larger than 2TB and faster startup, sleep, resume, and shutdown times. Too, it unlocks new security features available on Windows 11 and Windows 10. For case, "Secure Kicking" is a feature that tin can protect a device's startup procedure from malicious programs, and at present it's a prerequisite to install Windows 11. "Device Guard" gives you more than advanced controls for app admission, and "Credential Guard" can help preclude laissez passer-the-hash attacks.
In this Windows 10 guide, we will walk yous through the steps and information to use the Microsoft MBR2GPT command-line tool to catechumen a drive from MBR to GPT partition mode, to switch from BIOS to UEFI mode on your device, and enable Secure Boot correctly.
- How to convert a bulldoze from MBR to GPT on Windows 10
- How to change the firmware manner from BIOS to UEFI
Warning: This is a not-subversive process, simply it's yet recommended to make a full backup of your PC before proceeding in the example that something goes wrong and you lot need to recover your setup.
How to convert a drive from MBR to GPT on Windows x
Unlike older methods requiring a backup of your data and reinstalling Windows, the MBR2GPT tool makes it piece of cake to modify the partition style speedily. When using this tool, the conversion procedure adds the GPT components to the MBR partition without modifying the existing partition and maintaining the data untouched.
The best approach is switching to UEFI and performing a clean install of Windows 11. Notwithstanding, if you already have a Windows 10 installation that you want to upgrade, y'all tin convert the drive to change the organisation firmware settings properly. Otherwise, the device will no longer start correctly.
Check MBR or GPT partition style
Before making organisation changes, check the current settings to see whether the organization is gear up to MBR or GPT using these steps:
- Open Start.
- Search for Disk Management and click the top outcome to open the experience.
-
Right-click the drive (where Windows x resides) and select the Backdrop option.
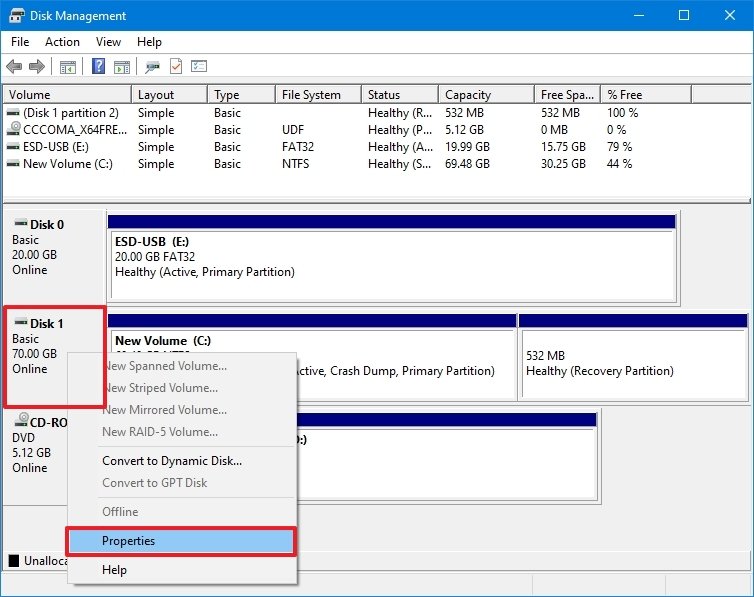 Source: Windows Central
 - Click on the Volumes tab.
-
Under the "Partitioning style" field, if the field reads GUID Partition Table (GPT), the drive does not demand conversion, merely if you come across the Principal Kicking Record (MBR) label, yous volition need to employ the conversion tool.
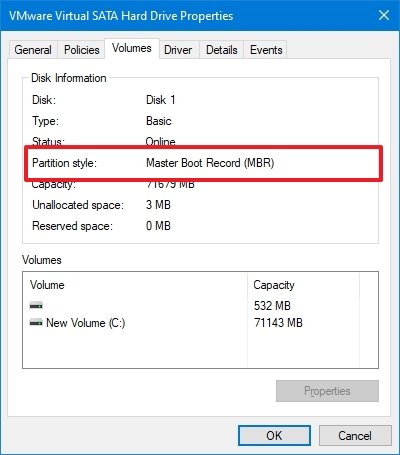 Source: Windows Primal
 - Click the Abolish button.


Once you complete the steps, you can change the partition style on the computer.
Also, if you demand to change the sectionalisation, check your device manufacturer's support website to notice out whether the hardware includes support for UEFI earlier using these instructions.
Convert MBR to GPT partition manner (offline)
To catechumen a drive using MBR to GPT on Windows 10, utilize these steps:
- Open Settings.
- Click on Update & Security.
- Click on Recovery.
-
Nether the "Avant-garde startup" section, click the Restart now push button.
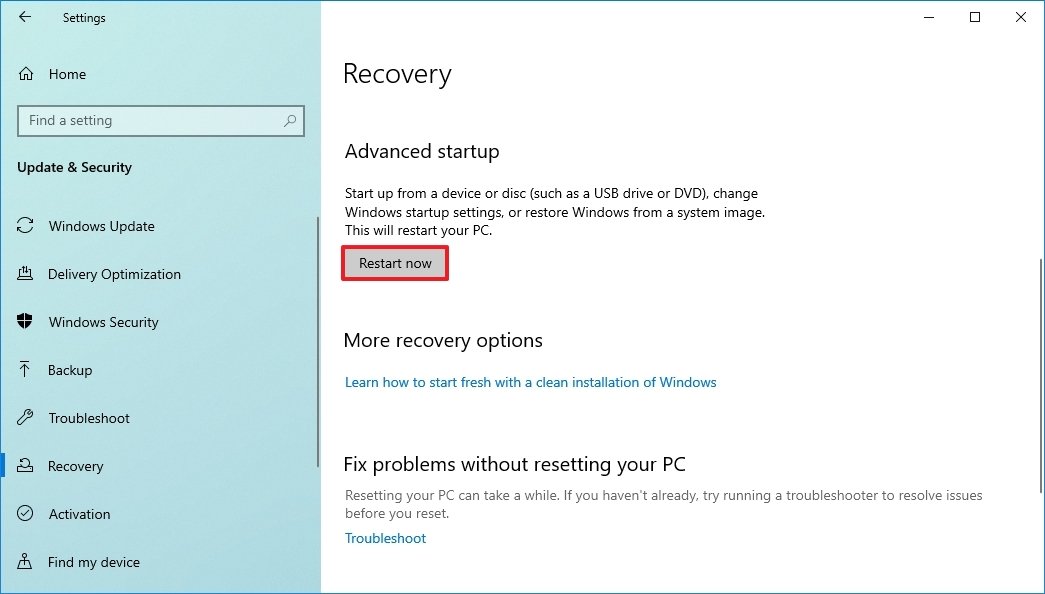 Source: Windows Central
 -
Click the Troubleshoot pick.
 Source: Windows Central
 -
Click on Advanced options.
 Source: Windows Central
 -
Click the Command Prompt pick.
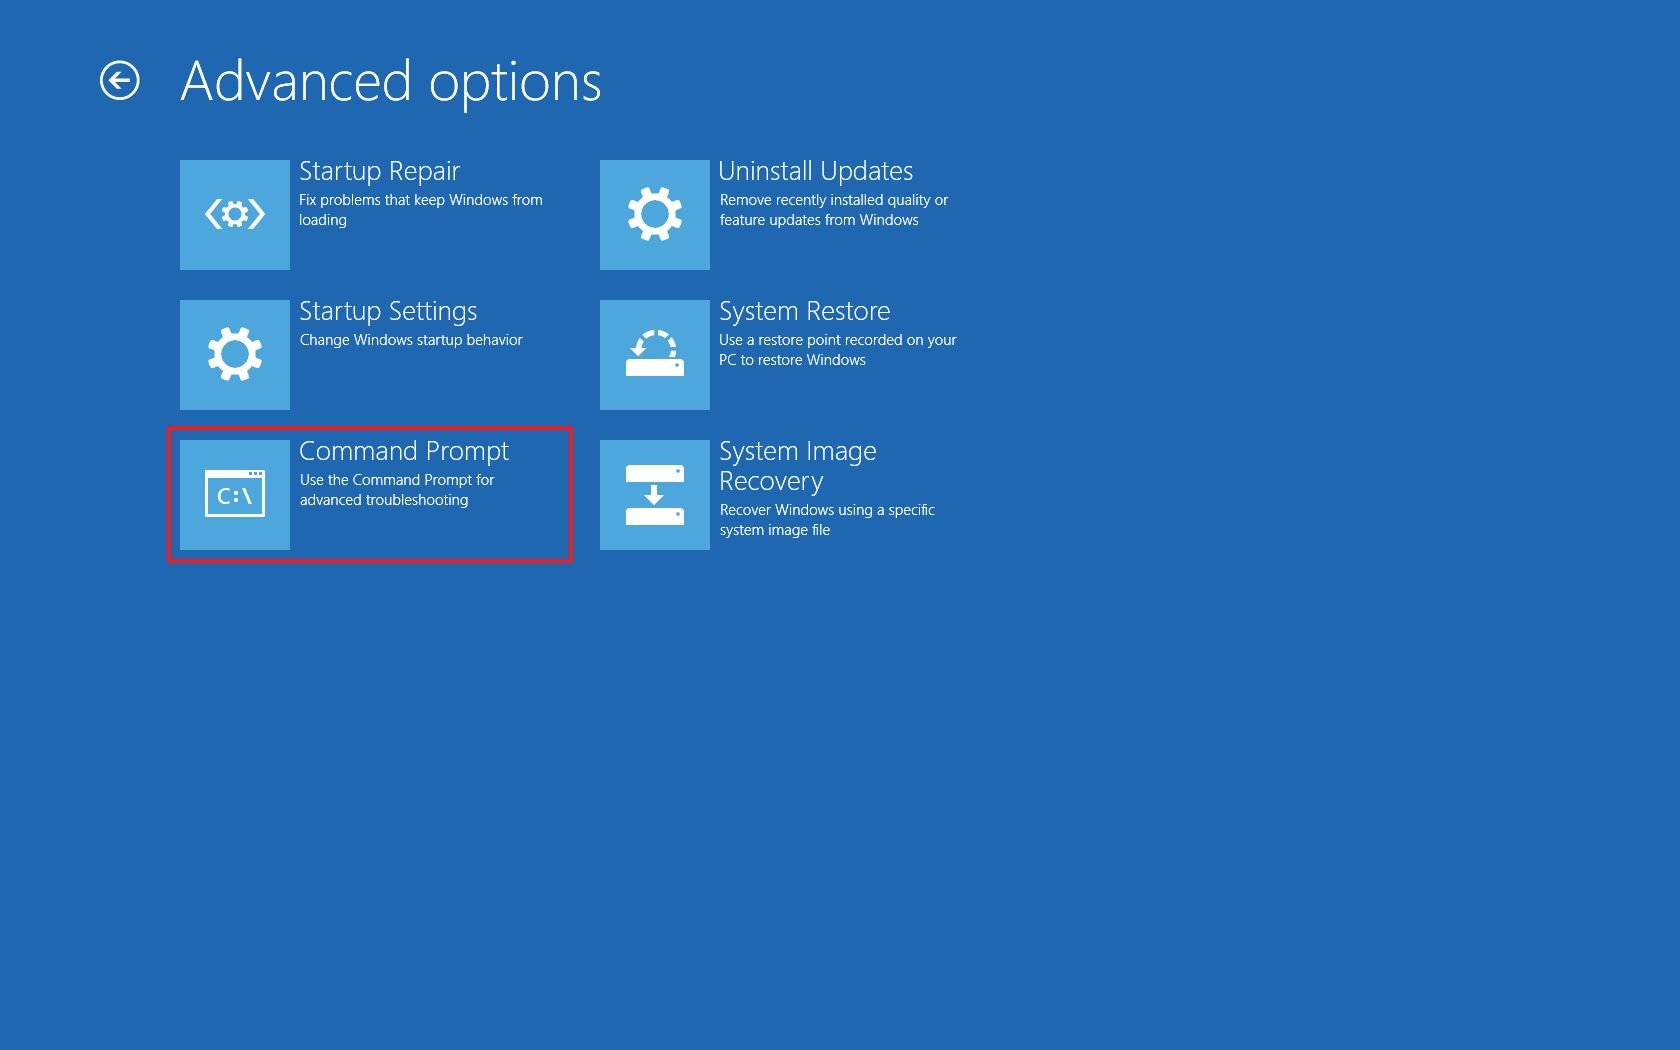 Source: Windows Central
 - Select your ambassador account and sign in (if applicable).
-
Blazon the post-obit command to validate the drive'south requirements and printing Enter:
mbr2gpt /validate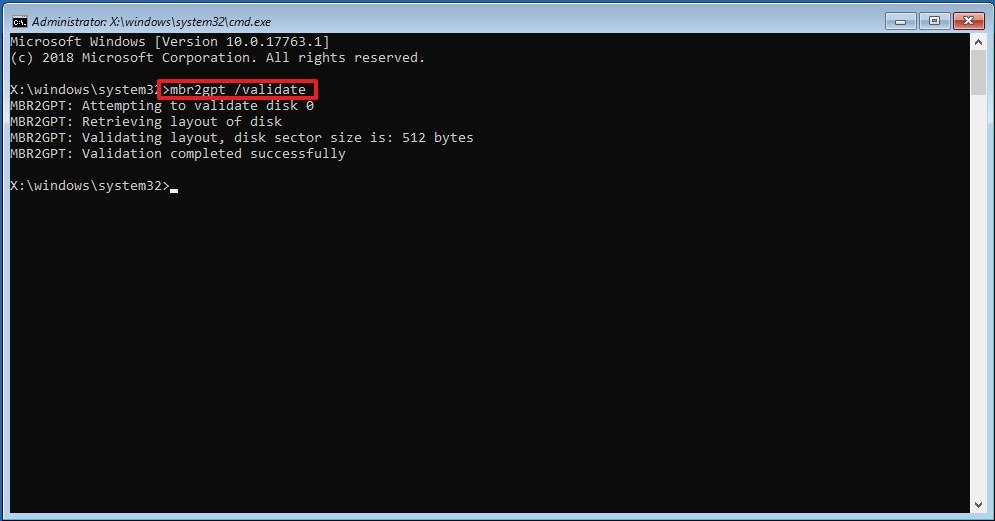 Source: Windows Key
 Quick tip: The mbr2gpt.exe is located in the "System32" folder within the "Windows" folder. If you want to see all the available options, use the
mbr2gpt /?command. -
Type the following command to catechumen the drive from MBR to GPT and press Enter:
mbr2gpt /convert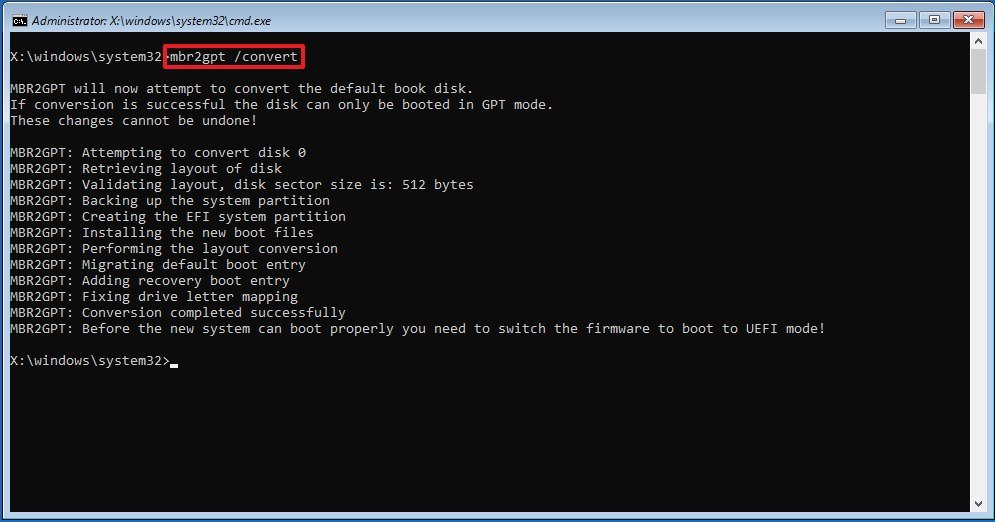 Source: Windows Central
 - Click the Close push.
- Click the Plough off your PC selection.


After you lot complete the steps, the tool volition validate the drive and create an EFI system partitioning (ESP). The process volition also insert the UEFI boot files and GPT components into the partition. The tool will update the Kick Configuration Data (BCD), and the previous drive letter will be added to the drive.
Convert MBR to GPT partition manner (online)
It'southward always recommended to use the MBR2GPT tool offline to avert potential problems. However, you can also run information technology when the arrangement is operational.
To catechumen a drive from MBR to GPT on Windows 10, utilise these steps:
- Open Showtime.
- Search for Command Prompt, right-click the top event, and select the Run as administrator option.
-
Type the following control to validate the drive and press Enter:
mbr2gpt /validate /allowFullOS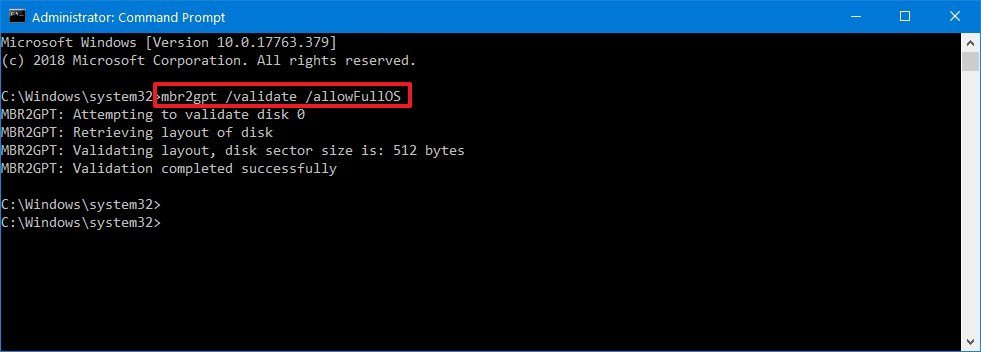 Source: Windows Key
 -
Type the following control to convert the drive to GPT and press Enter:
mbr2gpt /convert /allowFullOS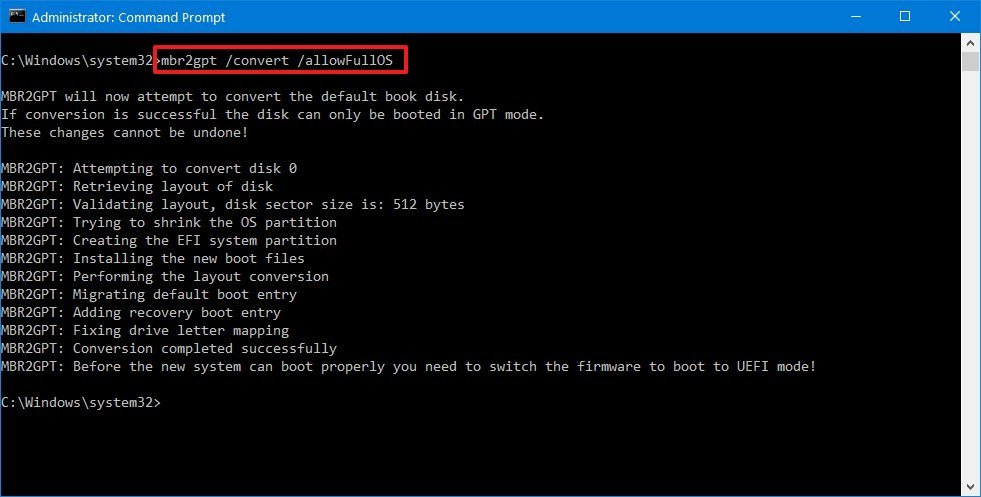 Source: Windows Key


One time you complete the steps, the control-line tool will reduce the size of the main sectionalisation and alter it from MBR to GPT.
MBR2GPT return codes
If the processes are completed successfully, the return code would exist "0," merely if the process fails, you may run across one of the xi mistake codes:
| Render lawmaking | Description |
|---|---|
| 1 | User canceled the conversion. |
| ii | Internal error. |
| 3 | Initialization error. |
| 4 | Invalid command-line parameters. |
| 5 | Mistake on the geometry and layout of the selected disk. |
| vi | Ane or more volumes on the disk are encrypted. |
| vii | Geometry and layout of the disk don't run into requirements. |
| 8 | Fault while creating the EFI system partition. |
| 9 | Error installing boot files. |
| 10 | Fault while applying GPT layout. |
| 100 | Successful conversion, but some boot configuration data didn't restore. |
MBR2GPT important details
You can use the MBR2GPT tool on a traditional hard drive (HDD), solid-state drive (SSD), or an M.ii drive with near any version of Windows 10, but yous must run the tool from a Windows 10 (version 1703 or later) installation.
When dealing with a drive using file encryption with BitLocker, you must first suspend the encryption before following the outlined instructions.
While MBR-style drives can take up to four principal partitions, the drive you desire to convert can't have more than three partitions considering i additional allocation is required to create the UEFI sectionalization.
Finally, Microsoft designed the tool to convert drives running Windows viii.ane, vii, or from an older version, but you can always upgrade the installation to the latest release of Windows 10 and then employ the tool to convert from MBR to GPT.
How to change the firmware mode from BIOS to UEFI
After converting the drive to the GPT style, the computer will no longer first until you change the firmware type from BIOS to UEFI in the motherboard.
Typically, this process requires hitting one of the function keys (F1, F2, F3, F10, or F12), Esc, or Delete key equally soon as you start the device. Nonetheless, since these options are always unlike, information technology'southward best to check your device manufacturer's support website for more specific details.
On the firmware interface, find the "Boot" menu, enable the UEFI pick, save the changes, and then the computer should start normally.
Also, if you plan to upgrade the device to Windows xi while in the UEFI settings, open up the kicking or security settings page, make sure to enable the "Secure Boot" option, and exit the firmware saving the changes.
Check GPT partition way
To ostend the device is using a GPT partition way, use these steps:
- Open First.
- Search for Disk Management and click the top consequence to open the app.
-
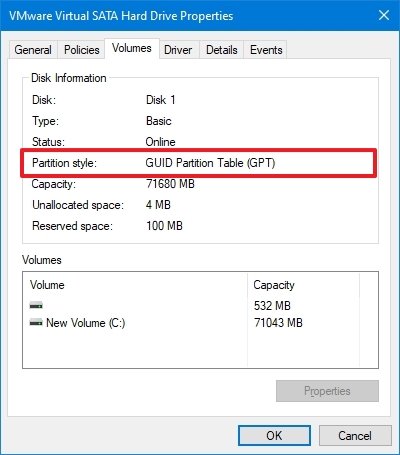
Right-click the primary drive and select the Properties option.
Source: Windows Central - Click on the Volumes tab.
-
Under the "Division fashion" field, the information should now read GUID Partition Table (GPT).
 Source: Windows Central

Later on you complete the steps, if the sectionalization is running using the correct partitioning manner, you only demand to bank check whether the device uses the UEFI firmware mode.
Bank check UEFI firmware
To confirm the reckoner is in UEFI fashion and Secure Boot is turned on, use these steps:
- Open Start.
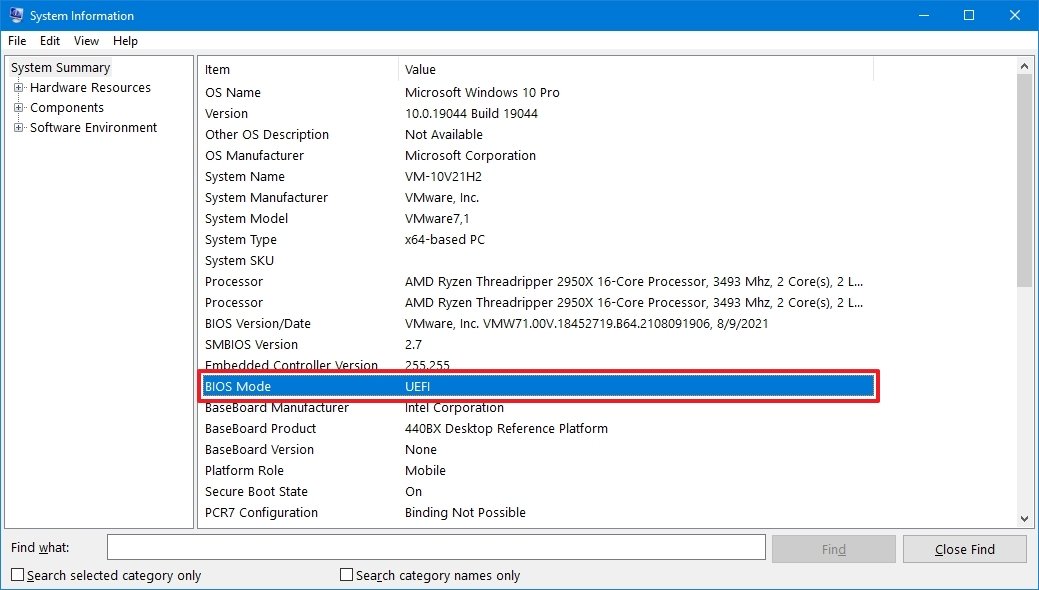
- Search for msinfo32 and click the top effect to open the System Information app.
- Click on System Summary on the left pane.
-
Check the "BIOS Style," which now should read UEFI.
 Source: Windows Central
 - Check the "Secure Boot State" data, which now should read On.

Once you complete the steps, if the Arrangement Information displays the style equally "UEFI," you have successfully switched the firmware blazon.
More Windows resource
For more than helpful manufactures, coverage, and answers to mutual questions about Windows 10 and Windows xi, visit the following resource:
- Windows eleven on Windows Central — All you need to know
- Windows xi aid, tips, and tricks
- Windows x on Windows Central — All yous need to know
Source: https://www.windowscentral.com/how-convert-mbr-disk-gpt-move-bios-uefi-windows-10
0 Response to "How to Know if You Are Using Windows 10 Mbr or Uefi"
Post a Comment